
This post won’t be about running.
You can tell that from the title – I hope.
If I look at the most searched topics that bring this blog to people’s attention you’d be surprised by how many of the random searches are to do with old Mercedes cars – a sub-group of ‘enthusiasts’ who put runners in the small place.
Anyway, this blog post is a ladybird guide to changing your oil and filter on a 1971 Mercedes 280SE 3.5. this car is known as a W108 if you’re ‘into’ old cars.

1971 Mercedes Benz W108

The 3.5l V8 version
This is the wikipedia page on it.
The beautiful body shape was designed by a Frenchman called Paul Bracq who went on to design some other iconic cars such as the the BMW 6-series of the 1970’s and the popemobile.
He also designed the TGV train.
Anyway, one of the things that makes the old Mercedes so easy to work on is that the design is completely standardised. The parts are still in supply and the tools used to work on the car are nearly all provided for in the original tool kit. The spares used in the cars will span several models and will stretch several decades. For example, things like the filters will fit cars that were in production from 1969 to 1985.
For this job you only need one tool – the 17mm spanner that comes with the original tool kit.

The tool kit
This job should take you about 1 hour if you are doing it on your own. I’ll run through it with as little text as possible and let the pictures do the talking.
This is a pretty easy job – one that you could mind the kids while doing, although they could get covered in oil. This is worth knowing as you could get bonus points at home for ‘minding the kids and changing the oil on the car at the same time’ and quash the propaganda that men can’t multi-task (driving and picking your nose, what d’y’call that?)
Kit

The cast and crew
You will need:
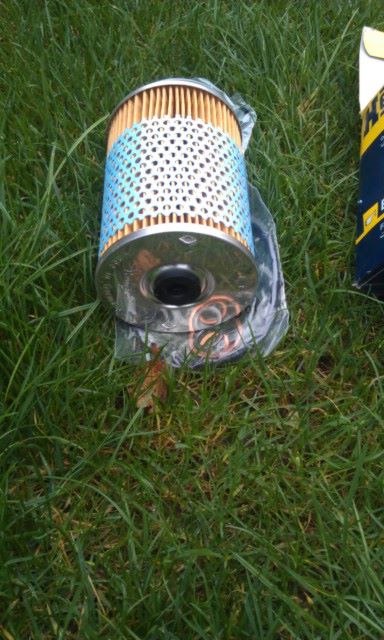
An Oil filter – on this car it is a replacement cartridge as the external housing is re-used. The filter comes with a replacement rubber O-ring for the filter housing and replacement washers.

Oil filter
2 x 5 litres of oil. I used 10w-40 but I would think 15w-40 would be fine as well.
A 10l container. This is for disposing of the waste oil. If you want you could just take the vacuum pump to the waste oil facility as long as you were confident it wasn’t going to fall over on the way there.
A 17mm spanner. There was one in the original tool kit. You could use a ratchet one if you wanted. This is for loosening (and tightening) the oil filter cartridge.
An old rag.
Some sort of funnel. This is so you don’t destroy the engine with the new oil. You can go and buy one or just take a 500ml drinks bottle, cut the end off of it and dry it out. Which is what I did.
A vacuum oil extractor (a vacuum pump). I have used a vacuum pump to empty the sump. The main reason for this is not because the car sump is hard to get to or anything technical but rather that because the oil volume on the car is about 8.0 litres and if you’re borrowing the kitchen plastic basin you’ll be having a major panic moment as the basin over-fills and ruins the driveway. Also, if you have to invest in a large volume shallow oil sump tray I think that the vacuum pump is a better investment. (Also, it’s my brother’s so I only borrow it).
Preparation
Start the car and take it for a bit of a drive. About a mile or two is enough. I drove to the nearest motor factor to get the second 5l container of oil. I already had everything else. If you are ordering things like oil filters you should be able to get them trough any motor factor or dealership that deals with MB as all parts are still catalogued on CD-rom. Also, I’d advise buying a few filters as they are cheap enough and will save you procrastinating when you do decide to change the oil.
The drive will warm the oil and make it easy to extract. When you open the engine bay the engine should be warm to touch but not so hot you’d burn your hand. Let it cool down a bit if you think it is too hot.
Changing the oil.
Make sure the car is parked on level ground. Before you turn it off make sure you lock the steering fully to the right.
Pull out the oil dip-stick, clean it and set it to one side.
Select the correct diameter extraction hose that fits into the dip-stick pipe. The vacuum pump will come with several of these to fit multiple engines.
Insert this into the dip-stick opening and push it down until it reaches the bottom of the sump (it won’t go any further).

vacuum hose in the dip-stick opening
Start pumping the vacuum pump. If the oil doesn’t start to flow easily just raise the vacuum pipe about 5mm as it is probably trying to suck up the base of the sump.

Vacuum hose from engine to vacuum pump

Pump handle up and down. Physics does the rest.
Sit back and try to look in control. The pump is doing all the work. You are the man and your neighbours’ wives are looking at their hopeless husbands who can barely operate an electric hedge strimmer and are wondering why they didn’t get a real man like you. Now is the right time to have a beer/scratch your balls/fart (or all three) ;-).
If the pump starts to slow down just give it a few more pumps.
Once the sump is empty you’ll need to remove the oil filter.
This car has the V8 engine and the oil filter is located under the right hand bank of cylinders (right hand side as you sit in the car looking forward).

The oil filter is the silver/grey cylinder between the exhaust manifold and the cable

This is a view from under the car. The filter is the silver/grey thing in the middle of the shot.
The reason you turned the steering fully right as you parked the car will now become apparent. To get your hand into the filter housing you’ll need to lie under the right hand wheel well. With the wheel turned full right you give yourself much more space and only your shoulder is under the car.

You can now reach in to the filter
There will be some oil still in the filter so some sort of container under the car as you loosen the retaining bolt is a good idea.
The bolt will only need 2 or 3 turns before you can loosen it by hand. If you can, you should try and take the housing out as vertically as possible to prevent oil spills.
Once the housing and filter is off the car you can empty the oil into the vacuum pump. There should be about a cup of oil in the container.
You can see from the picture that the existing filter has done it’s job.

You dirty article!
You can clean out the inside of the filter housing with the rag to minimise the amount of dirty oil left in the engine.
Pop out the old O-ring around the container and replace it with the new one (smear with a little fresh oil) that came with the filter. I left everything else as it was as the filter housing was in pretty good condition (no visible leaks).

O-ring on the housing and replacement O-ring
Put the new filter into the housing. Note that the filter has two different diameters at each end. Only one should fit into the end thread of the housing but if you forget this just remember that the end with the handle on it faces up.
New filter - this end faces down
Some people will advise you to fill the filter housing with oil but unless you are an indian rubber man I think you’re asking for trouble.
Now, re-attach the filter housing to the engine. It is a good idea to give it a good cleaning with the old rag as it will make hand tightening it much easier. It should thread on very easily. If it isn’t, don’t force it as you’ll de-thread the filter housing.
Once it has been hand tightened just tighten it up with the 17mm spanner. Nothing too dramatic.
Now you need to re-fill the car with oil. The car will take about 7.5 – 8.0l of oil so my advice is to fill it with the first 5l container and then fill in increments of 0.5 – 1.0l while checking the dip-stick to see how much oil you have in the engine. Over filling the engine with oil will lead to a smoky exhaust at best and engine damage at worst.

The oil goes in here!
To pour the oil in use the cut-off water bottle and the old rag to protect the engine from spillage and mess. If you spill the oil on the exhaust manifold (the rusty looking pipes in the earlier photograph) it will smoke as it is being burned off.

home-made funnel and 'anti-spill' device.
When you’re at about 7.0 – 7.5l of oil the dip-stick should be showing about full. If you have the 6 cylinder 2.8 you may have a different volume of oil so test it yourself.

Dip stick showing almost to the max line
Put the oil filler cap back on the engine head.
Now, start the engine and let it run for 2 or 3 minutes. The oil pressure gauge on the dashboard should show full pressure. The circulation of oil around the engine will fill the oil filter.
Turn off the engine and let the oil drain back to the sump. Dip the sump again and top-up the oil with about 0.5l of oil.
What I do now is to mark the date of the oil and filter change on the engine – and to mark the date of the next oil change on the frame by the car door. This is very anal, I will grant you that, but it is much easier than keeping it on a scrap of paper somewhere.

This makes you look very neat
I change it every 5,000km which might seem like an overkill but the oil will probably have gone off-condition with the low mileage I put up and it is a small cost to pay for keeping the engine in good condition.

Replace oil in 5,00km (the car has been around the clock 3 times). so the real reading is 317,776km
You should dispose of the oil at a waste oil recycling facility. Your local government or local authority or a nice friendly garage should be able to help you with this job.

Dispose of properly
Now, start the car again, rev the engine and sit there having another cold beer, warm in the knowledge that if the apocalypse comes they’ll eat you soft ‘electric hedge strimmer’ neighbour before they eat you as you are now ‘useful’ and can do stuff like work on cars………………….and do your soul-destroying normal day-job that probably involves spreadsheets.
You are The Man!
Scratch your balls and fart.
